CLICK HERE FOR FREE BLOGGER TEMPLATES, LINK BUTTONS AND MORE! »
Showing posts with label Alphabet Book. Show all posts

Z

Z is for Zoey!

She was very excited to get to Z (and no, not because that meant we are done :P). Since Z is a hard letter too, we just went with a self-portrait!


Y

Y is for Yolk.

Y is a hard letter. This was the best I could come up with. I let her draw a squiggly shape like a fried egg and then add the yolk with a yellow crayon.


X

X is for Xray!

I put a black construction paper background down so we could use white paint like "bones". I painted a few lines and dashes on her hand and let her stamp it down. She was a little fidgety today, we haven't got to work much so I think she was just excited :)


W

W is for Wizard with a wand. - yes lots of W's I know. I'm awesome.

I cut a blob, a triangle, and a rectangle out of construction paper and had her glue those down.

I painted her palm light brown and her fingers white for the beard. We added googly eyes and face stickers.

Yes, she wanted him to have the mustache. lol. Even though the mustache and beard don't match.... whatever, her art not mine.

 I used a hole punch for the silver swirls. I made a dotted line for the wand and let her draw it, then I added the star.

V

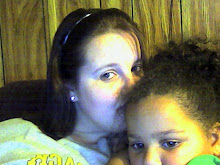
V is for Vase. 

I cut out the V and let her glue it down. 

I made dotted lined for the stems and let her trace them with a marker. Flowers and leaves are stickers.


U

U is for UNICORN!

Everyone does umbrella for U. I wanted to do something else. It took me forever to find a pre-k friendly unicorn craft that me and my limited drawing skills would be up to.

I finally found a unicorn that you can make out of their footprint.

Everything we used:

  • paint - white and brown (black would work too)
  • googly eye (you could always paint an eyeball instead)
  • glitter (just for some added fun)
  • dyed rice (to make the horn stand out, but you could paint it)

First make the foot print. I turned the paper long ways so she had enough room.


Add googly eye, nose, and mouth. Add hair, glitter will adhere to the paint.


Add glue in the shape of a tall, skinny triangle. Cover in dyed rice or even glitter. 


T

T is for Tomato.

Tomatoes are one of the daughter's favorites! She loves them. Like S, there were so many options for T. Trains, Tree, Tractor, etc.

We started with a red marker. I told her to draw a circle and color it in. She did not handle coloring in well with a marker so we moved to crayon. The leaves on top is her thumbprint in green paint. :)


S

S is for Stars.

I had many ideas for S, spiders, sun, stars, etc. So I let the little one decide and she wanted stars.

We glued down black construction paper for the sky and then made the stars out of squeeze glitter glue. I made a couple of stars hoping she would try, but she just decided to do dots *shrugs*.


R

R is for Rainbow!

I love rainbows, they are just so pretty and bright.

I like to switch up the materials we work with. What better way to make a rainbow than dyed rice! Which also starts with R. WIN! lol.

I wrote a post about how to dye rice. It is really easy and I have lots of pictures.

We did it one layer at a time and went slow. It was almost like working with glitter but no where near as messy. We added shredded cotton balls for clouds.


Q

Q is for Queen

Q is a hard letter. I used the same face stickers here that I used for the monster faces for the letter M. Her face is just a circle and her crown is just some scrap yellow paper that I had and I made it jagged on one side.

The glitter pom-pom is meant to be a shining jewel on her crown :)

P

P is for Pirate Ship.

Daughter loves pirates but the printer was not working or I would have just done a coloring page, cause I had ZERO ideas. I finally just copied the shaped of a pirate ship and let her glue it down. So she would have a little more to do I let her color the ocean below it.


O

O is for Octopus.

Of course we also made him Orange!

To make an octopus I painted daughter's hand with orange paint, all of it except her thumb. We stamped it down twice to make the 8 legs.


N

N is for Noodles.

One of daughter's favorite foods is noodles. She likes them cooked in many different dishes. I had a hard time deciding on what to do for the letter N.

Finally it hit me. Just let her glue down noodles. Easy right. :)


M

M is for Monster.

I lucked up and found face stickers with eyes, mouths, and noses for $1 during all of the back to school sales.

For the monster body I let her scribble on some paper and then I cut out her shape. We glued it with the scribble side down. Besides the stickers we also used pom-poms.


L

L is for Ladybug.

After I let her glue down my construction shapes, we added black buttons for spots and googly eyes.


K

K is for Kite. 

A little construction paper shape with a ribbon tail. 


J

J is for Jellyfish.

I cut out the construction paper body and some ribbons strips. I thought the different kinds of ribbon made him look neat. It works better to glue the ribbons down first and then add the body on top. Of course googly eyes!


I

I is for Ice Cream.

I cut out the shapes and then let her glue them down. We used Elmer's glue and glass seed beads for sprinkles. If your kids are still putting things in their mouth or if you just have other little ones around you might want make sprinkles out of something else. One option would be a hole punch.


H

H is for Haunted House.

I cut out a little house shape and windows from construction paper. I made the ghost. The other Halloween shapes are from OLD stationary I had and have never found a use for. The door is also from those envelopes. I gave her all the shapes and the glue stick and let her glue everything down where she wanted it.


G

G is for Grapes.

This page was as simple as can be. I painted her thump purple and we made a triangle of thumbprints.. I added the leaf after :)


Related Posts Plugin for WordPress, Blogger...